Data Security with UmbrelOS
By leveraging UmbrelOS and a TPM chip, users can securely store and automatically unlock an encrypted external hard drive, ensuring data privacy and seamless access on a personal home server.

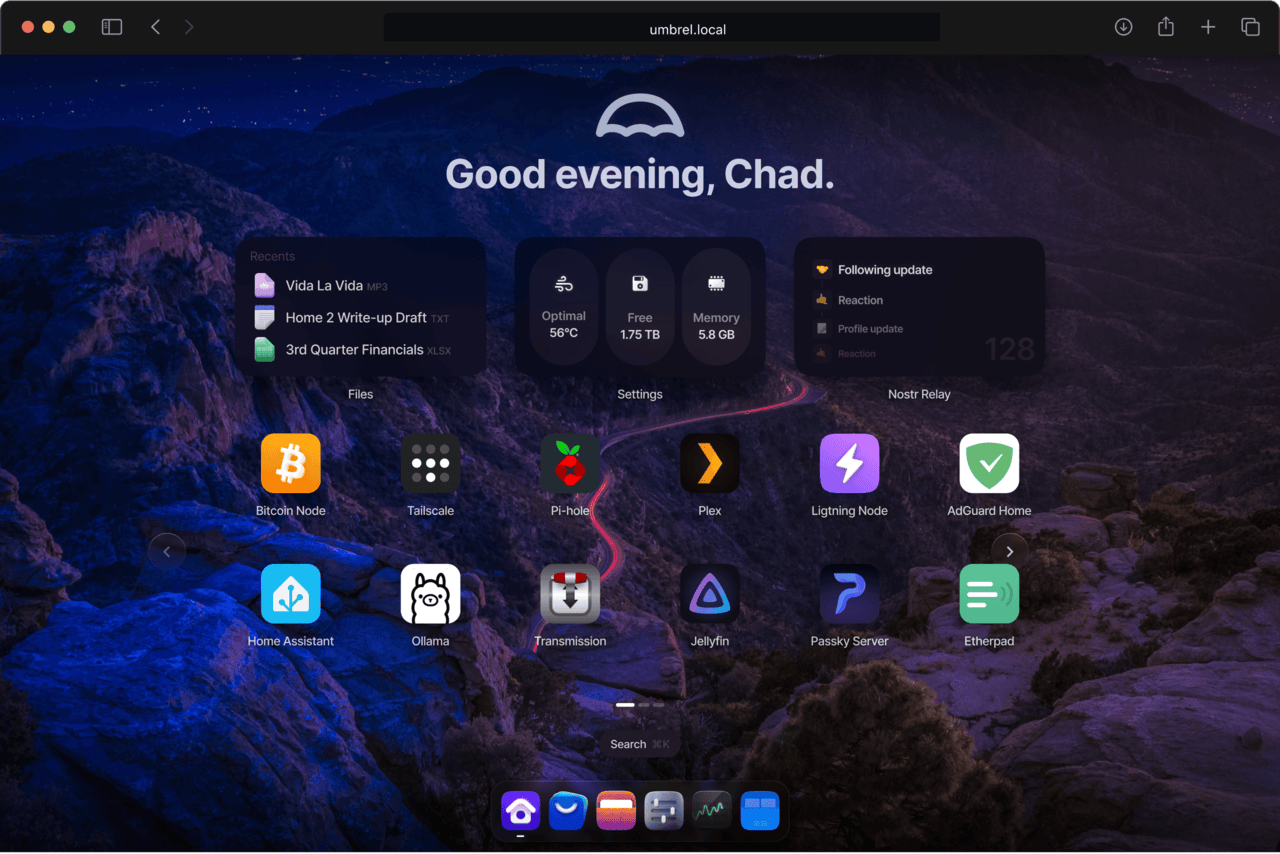
Table of Content
- Data Security with UmbrelOS
- Apps Portability with UmbrelOS
In an era where personal data—contacts, messages, photos, documents, and backups—is effortlessly swept up by big tech through their free, addictive apps, privacy has become a pressing concern. These corporations, and sometimes even governments, harness this data for purposes that often prioritize profit over user autonomy. For those seeking to reclaim control, storing data at home on a personal server offers a compelling solution. UmbrelOS, running on a mini PC, has emerged as a powerful platform for this, empowering users to host their own secure, private ecosystem. By pairing UmbrelOS with an encrypted external hard drive, you gain the added benefits of enhanced security and portability compared to relying on the mini PC’s built-in storage, which could be more susceptible to physical tampering or failure.
Yet, this setup isn’t without its challenges. Accessing an encrypted external drive requires an encryption password, and manually entering it every time your Umbrel device restarts—such as after a power outage when you’re away—can be a frustrating hurdle, leaving your data temporarily inaccessible. In this guide, we’ll explore a smarter approach: leveraging the Trusted Platform Module (TPM), a tiny yet robust security chip found in most modern devices. With a TPM, you can securely store your encryption password, automatically unlocking your encrypted external drive without storing sensitive information in plain text on the device’s internal drive, where it could be vulnerable to attacks. Let’s dive into how to set up UmbrelOS to make your data both secure and seamlessly accessible.
Mounting an External Hard Drive
Let’s set the stage: we’re already running UmbrelOS on a mini PC, hosting a suite of apps on its built-in 256GB hard drive. To accommodate our growing collection of data—be it app files, backups, or personal media—we’ve decided to expand our storage with a 2TB external hard drive. For optimal compatibility and performance with UmbrelOS, we’ve formatted this drive using the EXT4 file system and secured it with encryption, ensuring our data remains protected with a strong password.
To access the external drive manually, we’d typically connect it to our mini PC and dive into the UmbrelOS terminal. The process involves a few straightforward commands:
- Grants root access to the operating system.
sudo -i- Displays all connected drives and partitions, helping us identify our external drive, which we’ll assume has UUID 059a4e26-b1b4-4cc9-abb3-124c9fb176d2.
lsblk -f- Unlocks the encrypted drive by creating a decrypted mapping, prompting us to enter the encryption password.
cryptsetup luksOpen /dev/disk/by-uuid/059a4e26-b1b4-4cc9-abb3-124c9fb176d2 encrypted- Mounts the decrypted drive to a directory, making its contents accessible.
mount /dev/mapper/encrypted /mnt/extdriveWhile these steps are effective, they must be repeated every time our Umbrel device restarts—whether due to a planned reboot or an unexpected power outage. This manual process can be inconvenient, especially if we’re not physically present to enter the password. To eliminate this hassle, we want to automate the unlocking and mounting of the external drive, and that’s where the power of the TPM chip comes into play.
Understanding the TPM Chip
A Trusted Platform Module (TPM) is like a digital vault embedded in our mini PC. This specialized chip is designed to securely store sensitive information, such as encryption keys or passwords, in a way that’s extraordinarily difficult for attackers to access, even if they physically dismantle our device. Unlike storing a password in a plain text file on our device’s internal drive—where it could be vulnerable to unauthorized access—a TPM keeps our secrets locked away, only releasing them under specific, secure conditions.
Why Use a TPM for UmbrelOS?
Using a TPM to manage our external drive’s encryption password offers several compelling advantages:
- Enhanced Security: The TPM stores our encryption key in a tamper-resistant environment, ensuring it’s safe from prying eyes.
- Automatic Unlocking: It enables UmbrelOS to unlock and mount our encrypted drive seamlessly during startup, without requiring manual password entry.
- Tamper Protection: The TPM only releases the key if the device’s boot environment hasn’t been altered, adding a layer of defense against unauthorized access.
- Convenience Without Compromise: We avoid the risk of storing passwords in less secure locations while eliminating the need to type them after every reboot.
Does Our Device Have a TPM?
Before proceeding, we’ll need to confirm that our mini PC has a TPM chip. This is a quick check via the UmbrelOS terminal. Open the terminal and run the following command:
sudo dmesg | grep -i tpmIf the output includes references to a TPM (e.g., “TPM found” or details about a TPM version), we’re good to go! If no TPM is detected, we may need to use a device equipped with a TPM chip or explore alternative secure key management methods, which we’ll touch on later.
Auto-Unlock
Let’s set up our UmbrelOS to unlock our encrypted external drive automatically using the TPM chip. We’ll need to use the terminal.
- Grants root access to the operating system.
sudo -i- Make a workspace to keep things organized.
mkdir /root/ext_drive_tpm- Install the official toolset for working with TPM 2.0 chips.
apt -y install tpm2-tools- Temporary store our encryption password to a file. In the next steps, we’ll store this inside TPM securely and then delete this file.
echo "your-luks-disk-password" > /root/ext_drive_tpm/luks_key.txt
- Check for existing persistent TPM objects. This will list the existing TPM "slots." Pick a number that's not listed — for example,
0x81000003.
tpm2_getcap handles-persistent- Create a Primary Key inside TPM, which will act as the root for the secure storage.
tpm2_createprimary -C o -g sha256 -G ecc -c /root/ext_drive_tpm/primary.ctx
- Make the primary key persistent so that the TPM key survives reboots and doesn’t need to be re-created each time. We’ll reference it by its handle
0x81000003.
tpm2_evictcontrol -C o -c /root/ext_drive_tpm/primary.ctx 0x81000003
- Instruct the TPM to lock away our encryption password in an object that only it can access after a secure boot.
tpm2_create -C 0x81000003 -u /root/ext_drive_tpm/luks_key.pub -r /root/ext_drive_tpm/luks_key.priv -i /root/ext_drive_tpm/luks_key.txt
- Copy and store the luks_key.pub and luks_key.priv files somewhere safe, outside of the mini PC. When UmbrelOS updates to a newer version, the files could be deleted, so they have to be restored.
- Permanently delete the original plain-text password and primary key.
shred -u /root/ext_drive_tpm/luks_key.txt
shred -u /root/ext_drive_tpm/primary.ctx- Create a file to store the unlock script.
nano /usr/local/bin/unlock_disk.sh- Paste the following content to the file. This script tries to unlock the external drive using the TPM-sealed key. If it fails (e.g., because the boot was tampered with), the system will simply skip the mount — safe and silent.
#!/bin/bash

DEVICE="/dev/disk/by-uuid/059a4e26-b1b4-4cc9-abb3-124c9fb176d2"
MAPPER_NAME="encrypted"
MOUNT_POINT="/mnt/extdrive"
TPM_DATA_DIR="/root/ext_drive_tpm"

# Try TPM auto-unseal first
if tpm2_load -C 0x81000003 -u "$TPM_DATA_DIR/luks_key.pub" -r "$TPM_DATA_DIR/luks_key.priv" -c "$TPM_DATA_DIR/load.ctx" 2>/dev/null; then
    if LUKS_PASSWORD=$(tpm2_unseal -c "$TPM_DATA_DIR/load.ctx" 2>/dev/null); then
        echo "✅ TPM unseal successful."

        echo "$LUKS_PASSWORD" | cryptsetup luksOpen "$DEVICE" "$MAPPER_NAME"
        UNLOCK_RESULT=$?

        unset LUKS_PASSWORD
    else
        echo "❌ TPM unseal failed."
        UNLOCK_RESULT=1
    fi
else
    echo "❌ TPM load failed."
    UNLOCK_RESULT=1
fi

# Only mount if disk unlocked successfully
if [ $UNLOCK_RESULT -eq 0 ]; then
    echo "✅ Disk unlocked successfully. Mounting..."
    mount "/dev/mapper/$MAPPER_NAME" "$MOUNT_POINT"
else
    echo "⚠️  Disk unlock failed. Skipping mounting and continuing boot."
fi

exit 0
- Make the script executable
chmod +x /usr/local/bin/unlock_disk.sh- Create a file to store an unlock systemd service that is executed on boot.
nano /etc/systemd/system/unlock-disk.service- Paste the following content to the file.
[Unit]
Description=Unlock and Mount Encrypted External Disk
After=network.target

[Service]
Type=oneshot
ExecStart=/usr/local/bin/unlock_disk.sh
RemainAfterExit=true
StandardOutput=journal+console

[Install]
WantedBy=multi-user.target- Enable the service.
systemctl enable unlock-disk- Reboot your UmbrelOS device
reboot- Upon restart, the system should automatically unlock and mount your external drive at /mnt/extdrive. Verify this by checking the mount point
df -h /mnt/extdriveIf the drive is listed, congratulations—your setup is complete!
Now, every time our Umbrel device boots, it will try to unlock and mount the external encrypted disk using the TPM chip — without human intervention, but only if the device booted securely.
UmbrelOS Update
When a new version of UmbrelOS is installed, the above configurations could be deleted. Here is a list of steps that should be executed to restore the configurations:
- Install cryptsetup
apt install cryptsetup- Install tpm2-tools
apt install tpm2-tools- Restore the luks_key.pub and luks_key.priv files in folder /root/ext_drive_tpm
- Restore the /usr/local/bin/unlock_disk.sh script.
- Make the script executable
chmod +x /usr/local/bin/unlock_disk.sh- Restore the /etc/systemd/system/unlock-disk.service file to execute the unlock systemd service on boot.
- Enable the service.
systemctl enable unlock-diskImportant: If you followed the Apps Portability with UmbrelOS, make sure to append the mount --bind command to your unlock_disk.sh script to correctly redirect UmbrelOS's app directory to the external drive.
What we achieved
With our UmbrelOS setup now fully optimized, we’ve achieved a powerful blend of security and convenience. By leveraging the Trusted Platform Module (TPM), we’ve securely stored our external drive encryption password, enabling our encrypted drive to automatically unlock and mount at startup. This setup ensures no sensitive data is left exposed in plain text and guarantees that the drive is only accessible when the system is in a trusted boot state. The result? A home server with enterprise-grade protection that doesn’t compromise on usability. Your data—whether it’s contacts, photos, or backups—is now safeguarded and effortlessly accessible, even after unexpected reboots, making your UmbrelOS-powered private cloud both a fortress and a seamless part of your daily life.
Umbrel 👀